Ley Line Outcrop
Last updated 2026-09-10
Ley Line Outcrops are open-world challenges that come in two forms: Blossoms of Revelation, awarding Character EXP Materials; and Blossoms of Wealth, awarding Mora. Both types also award Adventure EXP and Companionship EXP.
In Mondstadt and Liyue, Blossoms of Revelation are unlocked at Adventure Rank 8, and Blossoms of Wealth are unlocked at Adventure Rank 12. Regions other than Mondstadt and Liyue have both types unlocked at Adventure Rank 18 and after activating at least one Statue of The Seven in the corresponding region.
Descriptions
Overview
There are always two Ley Line Outcrops in each region of Teyvat, one Blossom of Revelation and one Blossom of Wealth. Touching an outcrop spawns Enemies; the type of enemies faced depends on the region the outcrop is in, while their levels scale to the player's World Level. Enemies spawned by outcrops will drop items, Mora and Character EXP like regular enemy encounters.
After defeating all enemies, a Ley Line Blossom will be revealed; revitalizing the blossom to gain rewards consumes either 20 Original Resin or 1 Condensed Resin. Once an outcrop is completed and its blossom revitalized, another will spawn in a different region within the same nation. Completed but unopened outcrops will remain where they are, and no new outcrop is spawned, until the Daily Reset.
For the Battle Pass' weekly mission "Complete Ley Line deposit challenges 15 times," only the challenges need to be completed; revitalizing the blossom (receiving rewards) is not required. For the achievements in the Bounty of the Earth achievement set, collecting the rewards is required.
Rewards and Scaling
The amount of Companionship EXP, Character EXP Materials or Mora you receive from completing an outcrop depends on the player's current World Level.
Along with the rewards chosen from the Blossom of Revelation/Wealth, defeated enemies will drop their corresponding materials.
| All | Revelation | Wealth | ||||||
|---|---|---|---|---|---|---|---|---|
| WL | Enemy Level |

|

|
 Character EXP Material Character EXP Material
|
Average
|
Average Efficiency (%) |

|
Efficiency (%) |
| 0 | 12 | 100 | 10 |  7 - 8 7 - 8 3 - 4 3 - 4 |
25,000 | 20.4 | 12,000 | 20.0 |
| 1 | 25 | 100 | 15 | 10 - 12 5 - 6 |
38,500 | 31.4 | 20,000 | 33.3 |
| 2 | 34 | 100 | 15 | 10 - 11 |
52,500 | 42.9 | 28,000 | 46.7 |
| 3 | 46 | 100 | 15 | 13 - 14 |
67,500 | 55.1 | 36,000 | 60.0 |
| 4 | 61 | 100 | 15 | 6 - 7 2 - 3 2 - 3 |
82,500 | 67.3 | 44,000 | 73.3 |
| 5 | 71 | 100 | 20 | 6 - 7 3 - 4 |
102,500 | 83.7 | 52,000 | 86.7 |
| 6 | 78 | 100 | 20 | 6 - 7 4 - 5 |
122,500 | - | 60,000 | - |
| 7 | 84 | |||||||
| 8 | 85 - 86 | |||||||
| 9 | 95 | |||||||
Enemies
Ley Line Outcrop locations come in groups, and after every daily reset, the initial location for the Blossom of Wealth and the Blossom of Revelation for each region will be the first in the selected groups. The groups are named after their general location. Unless otherwise specified, after claiming the rewards from an Outcrop, it transitions to the next location in the group; if that location is already occupied by the Outcrop of the other type, then the location after that is chosen. While most Outcrops have a fixed location that they transition to, some have multiple possible transitions, mainly the ones that are the last in a group.
Mondstadt
Windwail Highland South
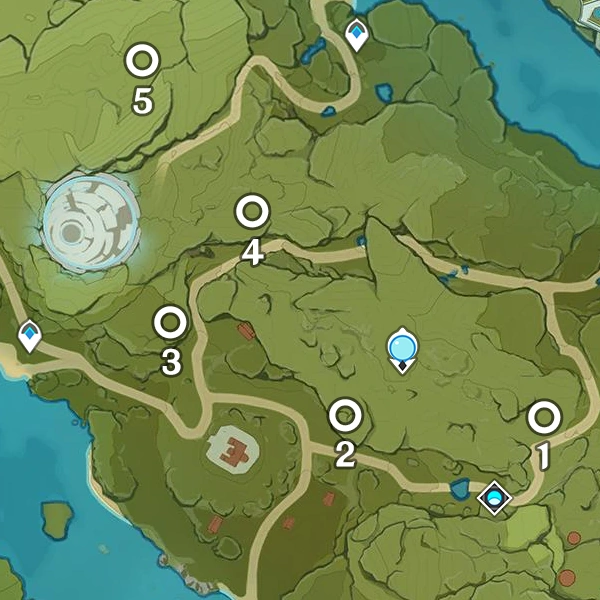
Begins northeast of the domain Valley of Remembrance.
| Location | Enemies | Notes |
|---|---|---|
| 1 | Wave 1: Wave 2: | Three Pyro Boom Blossoms and three Vines surround the outcrop. |
| 2 | Wave 1:
Wave 2: |
|
| 3 | Wave 1: Wave 2: | Transitions to either location 5 or Starfell Valley. |
| 4 | Wave 1: Wave 2: | Transitions to either location 3 or 5. |
| 5 | Transitions to Windwail Highland North 1. |


Windwail Highland North

Begins northeast of the domain Cecilia Garden.
| Location | Enemies | Notes |
|---|---|---|
| 1 | Wave 1: Wave 2: | |
| 2 |
| |
| 3 | Wave 1: Wave 2: | |
| 4 | Wave 1: Wave 2: | Transitions to either Stormterror's Lair 1, Starfell Valley 1, or Starfell Valley 5. |


Stormterror's Lair

Begins northwest of the Statue of The Seven in Stormterror's Lair.
| Location | Enemies | Notes |
|---|---|---|
| 1 | Wave 1: Wave 2: | |
| 2 |
| |
| 3 |
| |
| 4 | Wave 1: Wave 2: | Transitions to either Starfell Valley 5, Windrise to Springvale 1, or Dadaupa Gorge to Windrise 1. |


Starfell Valley

Begins west of the Teleport Waypoint near Thousand Winds Temple.
| Location | Enemies | Notes |
|---|---|---|
| 1 | Wave 1: Wave 2: | Three Exploding Barrels are located around the outcrop. |
| 2 | Wave 1: Wave 2: | |
| 3 | Wave 1: Wave 2: | |
| 4 | Wave 1: Wave 2: | |
| 5 | Wave 1: Wave 2: | Transitions to Stormbearer Point 1. |


Stormbearer Point

Begins southwest of the Teleport Waypoint in Stormbearer Point.
| Location | Enemies | Notes |
|---|---|---|
| 1 | Wave 1: Wave 2: | |
| 2 | Wave 1: Wave 2: | |
| 3 | Wave 1: Wave 2: | |
| 4 | Wave 1: Wave 2: | Transitions to either Stormterror's Lair 1 or Dadaupa Gorge to Windrise 1. |


Dadaupa Gorge to Windrise

Begins west of the domain Eagle's Gate.
| Location | Enemies | Notes |
|---|---|---|
| 1 | Wave 1: Wave 2: | |
| 2 | Wave 1: Wave 2: | |
| 3 | Wave 1: Wave 2: | |
| 4 | Wave 1: Wave 2: | |
| 5 | Wave 1: Wave 2: | Transitions to Windrise to Springvale 5. |
Windrise to Springvale
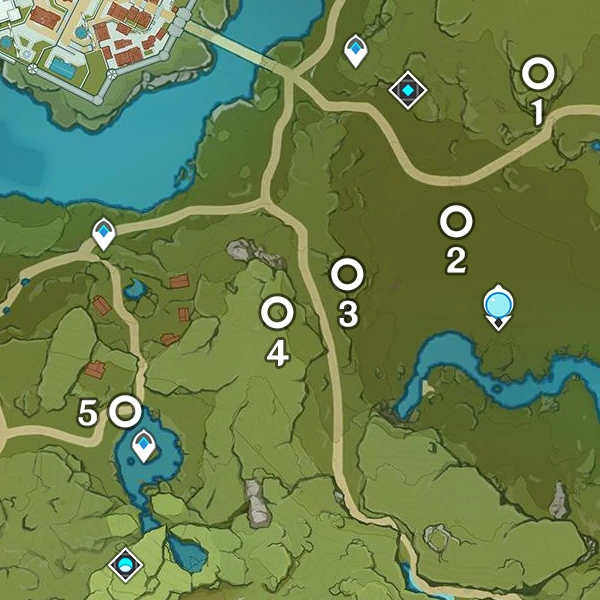
Begins east of the domain Temple of the Falcon.
| Location | Enemies | Notes |
|---|---|---|
| 1 | Wave 1: Wave 2: | |
| 2 | Wave 1: Wave 2: | |
| 3 | Wave 1:
Wave 2: | |
| 4 | Wave 1: Wave 2: | |
| 5 | Wave 1: Wave 2: | Transitions to Windwail Highland South 1. |


Millhaven
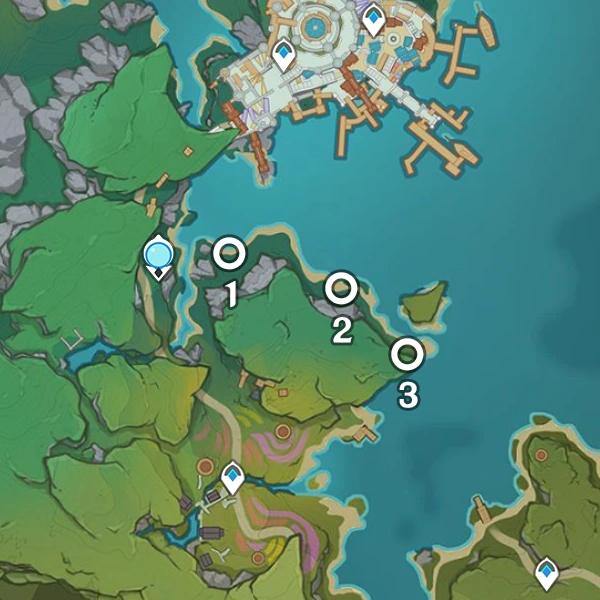
Begins east of the Statue of The Seven in Millhaven.
| Location | Enemies | Notes |
|---|---|---|
| 1 | Wave 1: Wave 2: | |
| 2 | Wave 1: Wave 2: | |
| 3 | Wave 1: Wave 2: | Transitions to Starfell Valley 5. |


Liyue
Bishui Plain Northwest to Stone Gate

Begins near the Teleport Waypoint southwest of Qingce Village.
| Location | Enemies | Notes |
|---|---|---|
| 1 | Wave 1: Wave 2: | Five Pyro Boom Blossoms and three Vines surround the outcrop. |
| 2 | Wave 1:
Wave 2: | |
| 3 | Wave 1: Wave 2: | |
| 4 | Wave 1: Wave 2: | |
| 5 | ||
| 6 | Transitions to Stone Gate to Sal Terrae 1. |


Stone Gate to Sal Terrae

Begins north of the lake near Stone Gate.
| Location | Enemies | Notes |
|---|---|---|
| 1 | Wave 1: Wave 2: | |
| 2 | Wave 1:
Wave 2:
| |
| 3 | Wave 1: Wave 2: | |
| 4 | Wave 1: Wave 2: | |
| 5 | Wave 1: Wave 2: | Transitions to Sal Terrae to Qiongji Estuary 1. |

Sal Terrae to Qiongji Estuary

Begins near the Teleport Waypoint in Sal Terrae.
| Location | Enemies | Notes |
|---|---|---|
| 1 | Wave 1: Wave 2: | |
| 2 | Wave 1:
Wave 2: | |
| 3 | ||
| 4 | Wave 1: Wave 2: | Transitions to Yaoguang Shoal to Guili Plains 1. |


Yaoguang Shoal to Guili Plains

Begins west of the Statue of The Seven in Yaoguang Shoal.
| Location | Enemies | Notes |
|---|---|---|
| 1 | Wave 1: Wave 2: | |
| 2 |
| |
| 3 | Wave 1: Wave 2: | |
| 4 | Wave 1: Wave 2: | |
| 5 | Wave 1:
Wave 2: |
|

Guyun Stone Forest

Begins near the Teleport Waypoint in Guyun Stone Forest.
| Location | Enemies | Notes |
|---|---|---|
| 1 | Wave 1:
Wave 2: | Three Mist Flowers surround the outcrop. |
| 2 | ||
| 3 | Wave 1:
Wave 2: | |
| 4 | Wave 1: Wave 2: | Transitions to either Lisha or Minlin West 1. |

Lisha
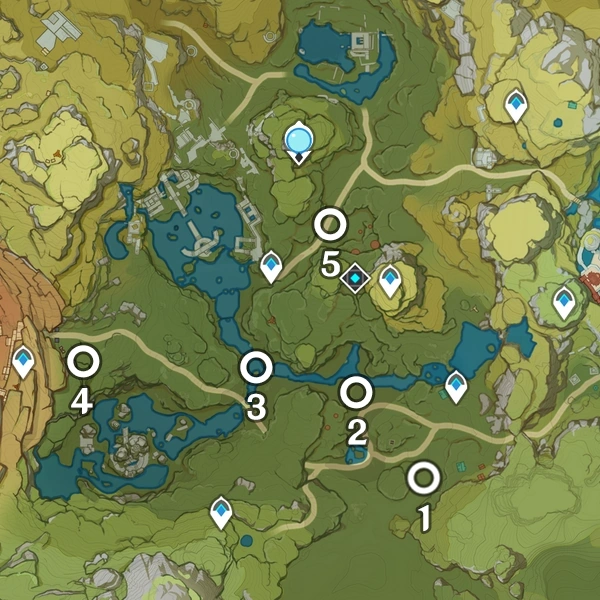
Begins in the southern outskirts of Lisha.
| Location | Enemies | Notes |
|---|---|---|
| 1 |
| |
| 2 | Wave 1: Wave 2:
| Three Pyro Boom Blossoms and three Vines surround the outcrop. |
| 3 | Wave 1:
Wave 2: | |
| 4 | Wave 1: Wave 2: | |
| 5 | Wave 1: Wave 2: |
|
Sea of Clouds to Guili Plains

Begins east of the Statue of The Seven in Sea of Clouds.
| Location | Enemies | Notes |
|---|---|---|
| 1 | Wave 1: Wave 2: | |
| 2 | ||
| 3 | Wave 1: Wave 2: | Five exploding barrels are located around the outcrop. |
| 4 | Wave 1:
Wave 2: | |
| 5 |
| Transitions to Yaoguang Shoal to Guili Plains 4. |

Dunyu Ruins to Luhua Pool
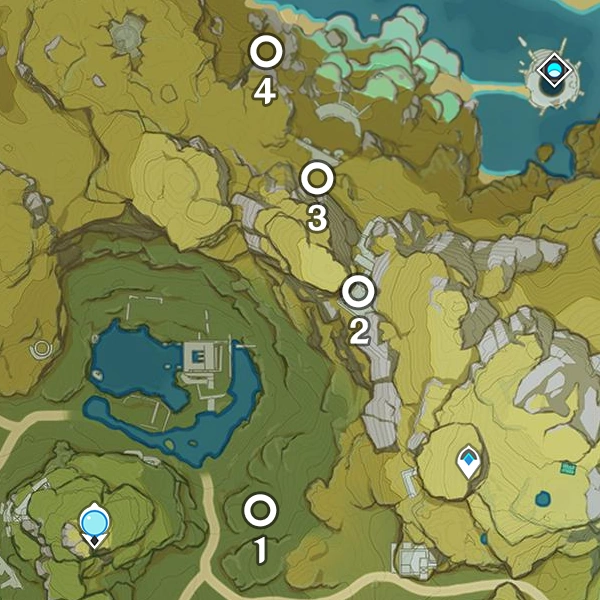
Begins east of the Statue of the Seven near Dunyu Ruins.
| Location | Enemies | Notes |
|---|---|---|
| 1 | Wave 1:
Wave 2: | |
| 2 | Wave 1:
Wave 2: | |
| 3 | Wave 1: Wave 2: | |
| 4 | Wave 1: Wave 2: | Transitions to Jueyun Karst to Guili Plains 4. |
Minlin West
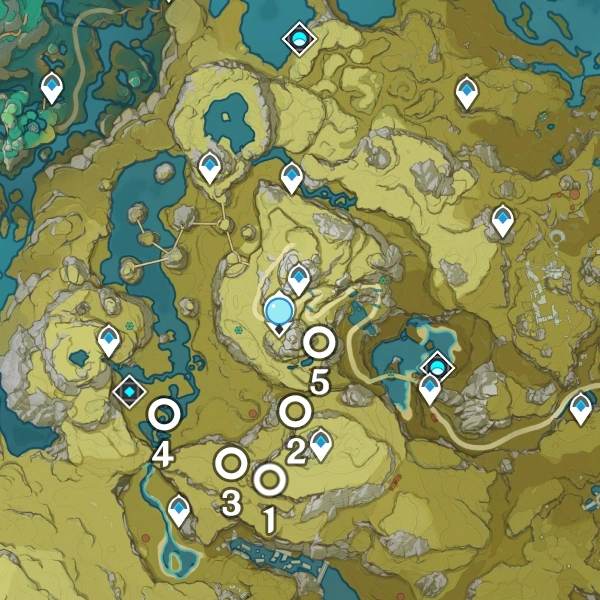
Begins near a Teleport Waypoint north of Primo Geovishap.
| Location | Enemies | Notes |
|---|---|---|
| 1 | Wave 1:
Wave 2:
Wave 3:
| Three Flaming Flowers and four Vines surround the outcrop. |
| 2 | ||
| 3 |
| |
| 4 | Wave 1:
Wave 2: | Transitions to Jueyun Karst to Guili Plains 1. |
| 5 | Wave 1: Wave 2: | Transitions to Nantianmen 1. |

Nantianmen
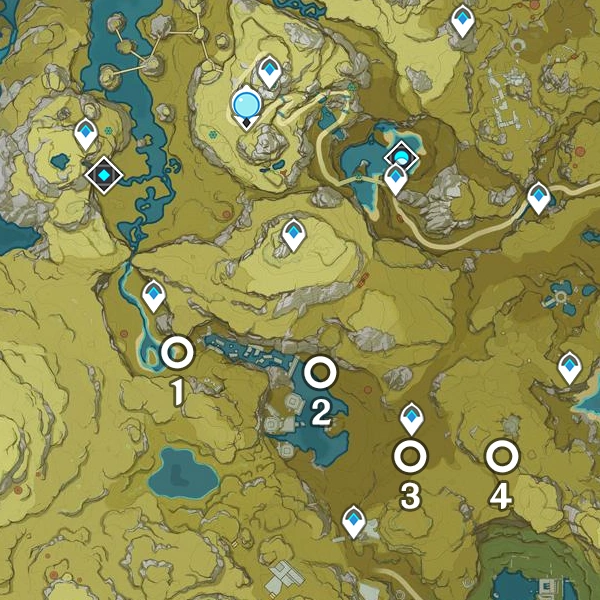
Begins near the Teleport Waypoint in Nantianmen.
| Location | Enemies | Notes |
|---|---|---|
| 1 |
| Three Pyro Boom Blossoms surround the outcrop. |
| 2 | ||
| 3 | Wave 1: Wave 2: | |
| 4 | Wave 1: Wave 2: |
|
Jueyun Karst to Guili Plains

Begins east of the domain Taishan Mansion.
| Location | Enemies | Notes |
|---|---|---|
| 1 | Wave 1: Wave 2: | |
| 2 | Wave 1: Wave 2: | |
| 3 | Wave 1:
Wave 2: | Four Tourmaline crystals surround the outcrop. |
| 4 | Wave 1: Wave 2: |
|
Bishui Plain to Minlin North

Begins near a Teleport Waypoint east of Yaodie Valley.
| Location | Enemies | Notes |
|---|---|---|
| 1 | Wave 1:
Wave 2:
| |
| 2 | ||
| 3 | Wave 1: Wave 2: | |
| 4 | Wave 1: Wave 2: |
|
| 5 | Transitions to Jueyun Karst to Guili Plains 2. |
Mt. Xuanlian
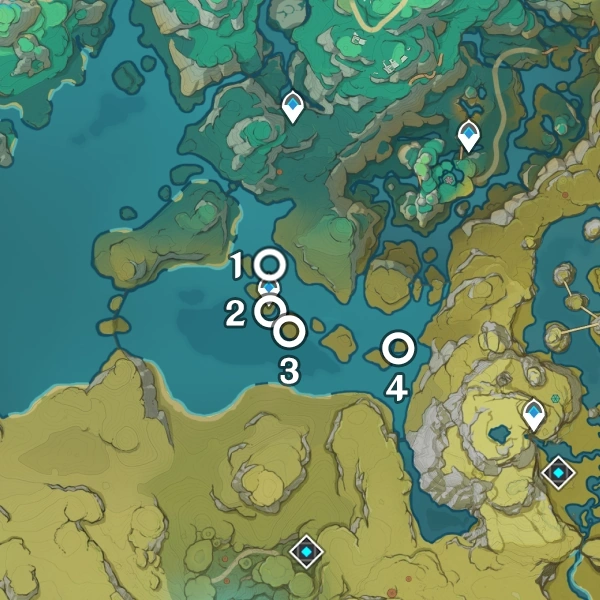
Begins near the Teleport Waypoint in the southern outskirts of Chenyu Vale.
| Location | Enemies | Notes |
|---|---|---|
| 1 | Wave 1: Wave 2: | |
| 2 | Wave 1: Wave 2: | |
| 3 | Wave 1: Wave 2: | |
| 4 | Wave 1: Wave 2: | Transitions to Yoadie Valley 1. |

Yaodie Valley
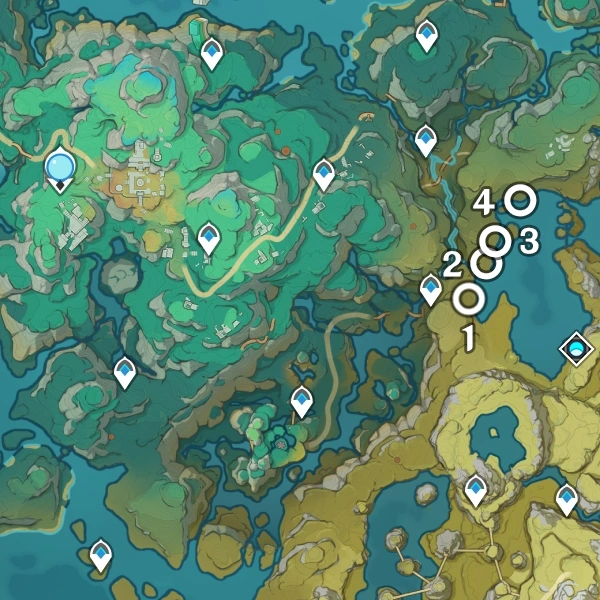
Begins near the Teleport Waypoint south of Yaodie Valley.
| Location | Enemies | Notes |
|---|---|---|
| 1 | Wave 1:
Wave 2:
| |
| 2 | Wave 1: Wave 2: | |
| 3 | Wave 1: Wave 2: | |
| 4 | Wave 1: Wave 2: | Transitions to Bishui Plain Northwest to Stone Gate 1. |
Inazuma
Narukami Island
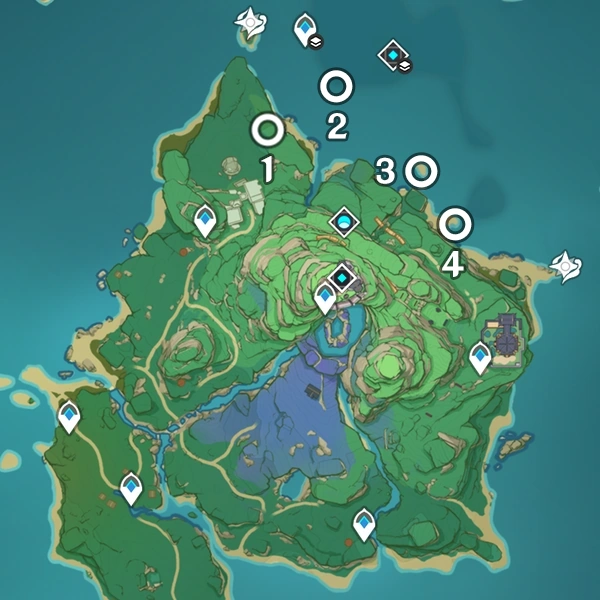
Begins in Araumi, northeast of the northernmost Teleport Waypoint on the main Narukami Island landmass.
| Location | Enemies | Notes |
|---|---|---|
| 1 | Wave 1:
Wave 2: | Four Ruin Cruisers are patrolling the area, and will join the fight if not dealt with beforehand. |
| 2 | Wave 1:
Wave 2: |
A  Cryo Abyss Mage patrols the area, as well as a training dummy. Breaking it will spawn a Cryo Abyss Mage patrols the area, as well as a training dummy. Breaking it will spawn a  Thunderhelm Lawachurl. Thunderhelm Lawachurl. |
| 3 | ||
| 4 | Transitions to Yashiori Island 1. |


Yashiori Island
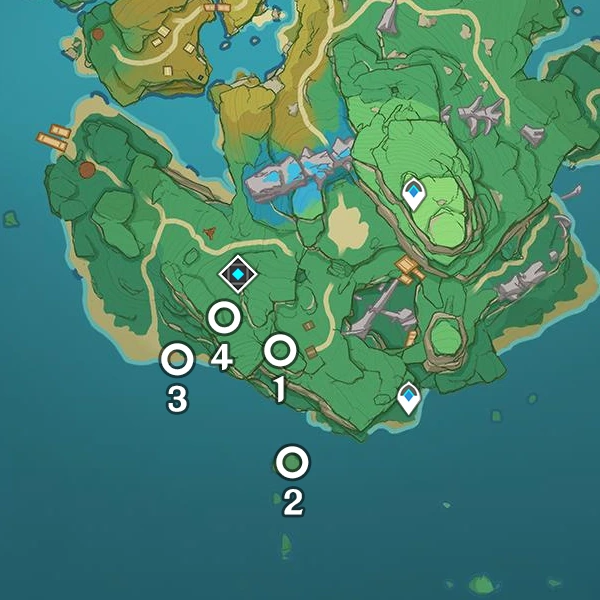
Begins southeast of the domain Formation Estate.
| Location | Enemies | Notes |
|---|---|---|
| 1 | ||
| 2 | Thunder Sakura Bough and Thunder Sphere leads to the next outcrop challenge. | |
| 3 | Wave 1: Wave 2: |
Nearby a  Nobushi and a Nobushi and a  Kairagi: Fiery Might may join the battle if not dealt with beforehand. Kairagi: Fiery Might may join the battle if not dealt with beforehand. |
| 4 | Transitions to Watatsumi Island 1. |
Watatsumi Island
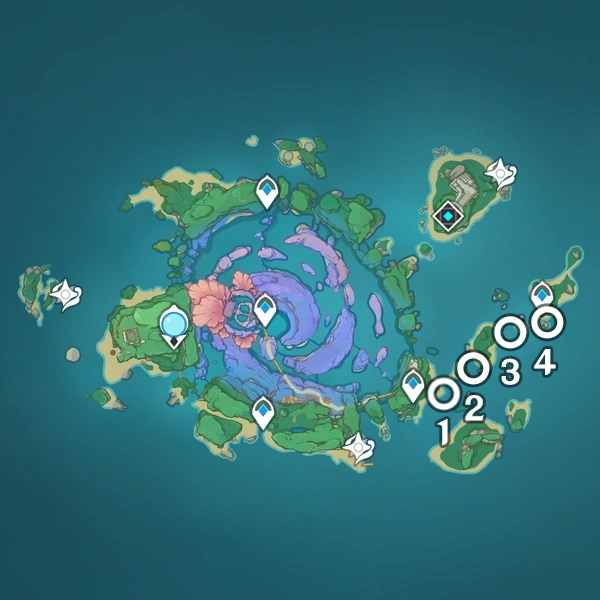
Begins east of the eastern Teleport Waypoint in Bourou Village.
| Location | Enemies | Notes |
|---|---|---|
| 1 | Wave 1: Wave 2: | |
| 2 | Wave 1: Wave 2: |
Three Nobushi: Jintouban nearby and will engage in combat. |
| 3 | Wave 1:
Wave 2: | |
| 4 | Wave 1:
Wave 2:
| Transitions to Seirai Island 1. |


Seirai Island
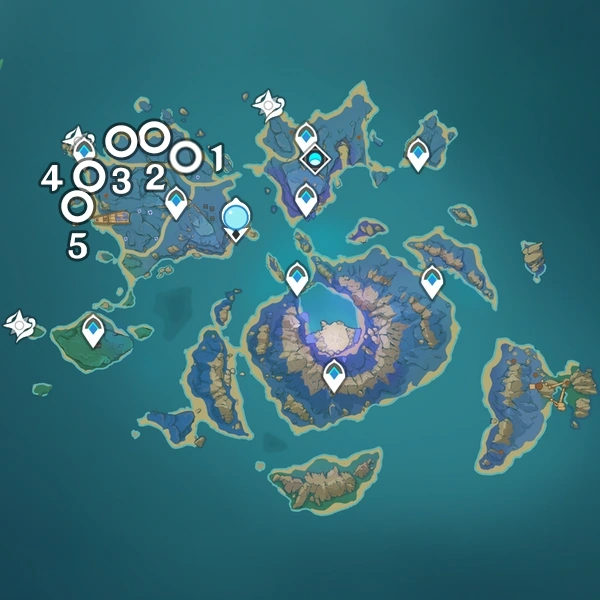
Begins north of the western Teleport Waypoint in Koseki Village.
| Location | Enemies | Notes |
|---|---|---|
| 1 | Wave 1: Wave 2: | |
| 2 | Wave 1: Wave 2: | |
| 3 | Wave 1: Wave 2: | Two Ruin Defenders can be found and will engage. |
| 4 | Wave 1: Wave 2: |
A  Fatui Cryo Cicin Mage can be found and will engage in combat. Fatui Cryo Cicin Mage can be found and will engage in combat. |
| 5 | Wave 1: Wave 2: |
|

Kannazuka
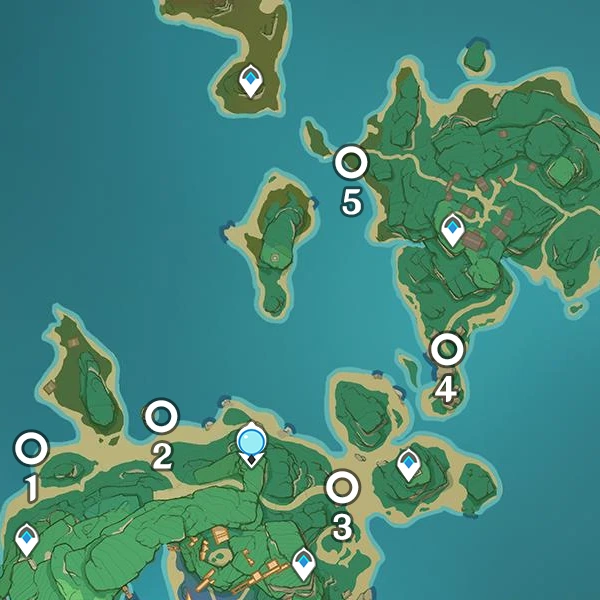
Begins north of the westernmost Teleport Waypoint in Tatarasuna.
| Location | Enemies | Notes |
|---|---|---|
| 1 | Wave 1: Wave 2: |
Hilichurl camp located directly south and near the outcrop. Two Explosive Barrels can be found as well to deal damage to the enemies. There is a  Kairagi: Dancing Thunder that can spawn when approaching the blossom from southwest. Kairagi: Dancing Thunder that can spawn when approaching the blossom from southwest. |
| 2 | Wave 1: Wave 2: | Two Exploding barrels near the outcrop. |
| 3 | Wave 1: Wave 2: |
A  Nobushi: Kikouban patrols near the area. Will engage if not dealt with beforehand. Nobushi: Kikouban patrols near the area. Will engage if not dealt with beforehand. |
| 4 | Wave 1:
Wave 2: | Multiple Nobushi patrolling the area. Will engage if not dealt with beforehand. |
| 5 |
| Transitions to Narukami Island 1. |
Sumeru
Lokapala Jungle
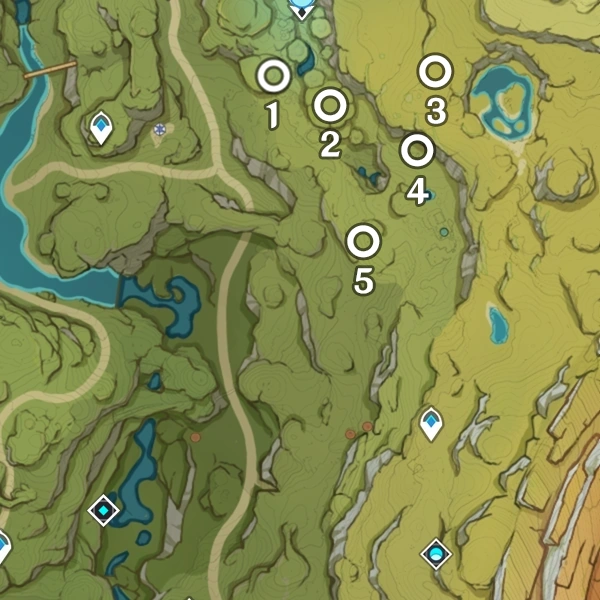
Begins southwest of the Statue of The Seven in Lokapala Jungle.
| Location | Enemies | Notes |
|---|---|---|
| 1 | Wave 1: Wave 2: | Use Four-Leaf Sigil for easier traveling across terrain. |
| 2 | Wave 1:
Wave 2: | Use Four-Leaf Sigil for easier traveling across terrain. There are two Dendro Exploding Barrel nearby. |
| 3 | Use Four-Leaf Sigil and Wind Currents for easier traveling across terrain. | |
| 4 | Wave 1: Wave 2: | |
| 5 | Wave 1: Wave 2: |
|


Ardravi Valley
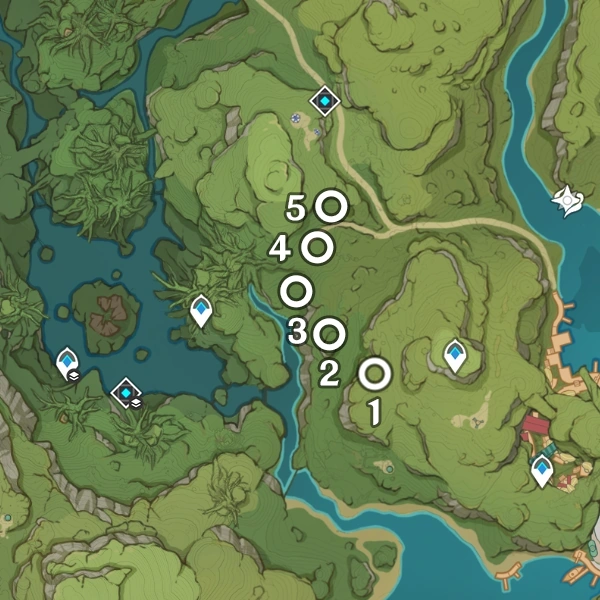
Begins west of the Teleport Waypoint at the top of the mountain near Port Ormos.
| Location | Enemies | Notes |
|---|---|---|
| 1 | Wave 1: Wave 2: | |
| 2 | Wave 1: Wave 2: | |
| 3 | Wave 1: Wave 2: | |
| 4 | Wave 1: Wave 2: | |
| 5 | Wave 1: Wave 2: | Transitions to Vissudha Field 1. |


Vissudha Field
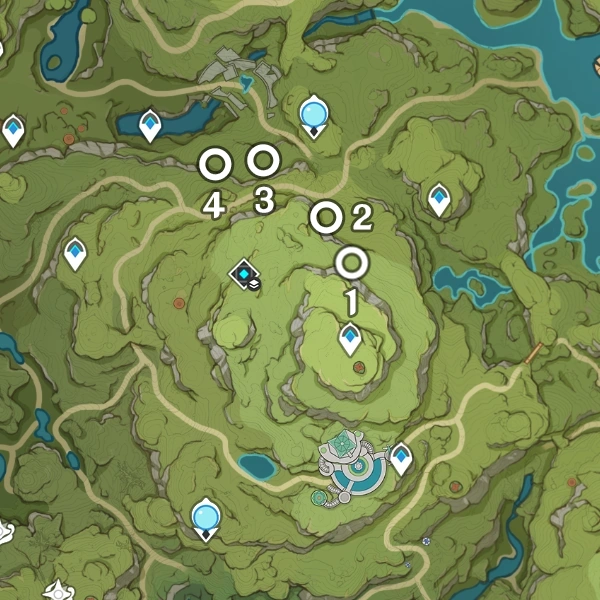
Begins north of the Teleport Waypoint at the top of the mountain near Pardis Dhyai.
| Location | Enemies | Notes |
|---|---|---|
| 1 | Wave 1: Wave 2: |
There is a  Ruin Drake: Earthguard nearby. Ruin Drake: Earthguard nearby. |
| 2 | Wave 1: Wave 2: | Three Pyro Boom Blossoms surround the outcrop. |
| 3 | Wave 1: Wave 2: |
There are three  Whirling Electro Fungus and a Ruin Drake: Earthguard nearby. Whirling Electro Fungus and a Ruin Drake: Earthguard nearby. |
| 4 | Wave 1: Wave 2: |
|
Ashavan Realm
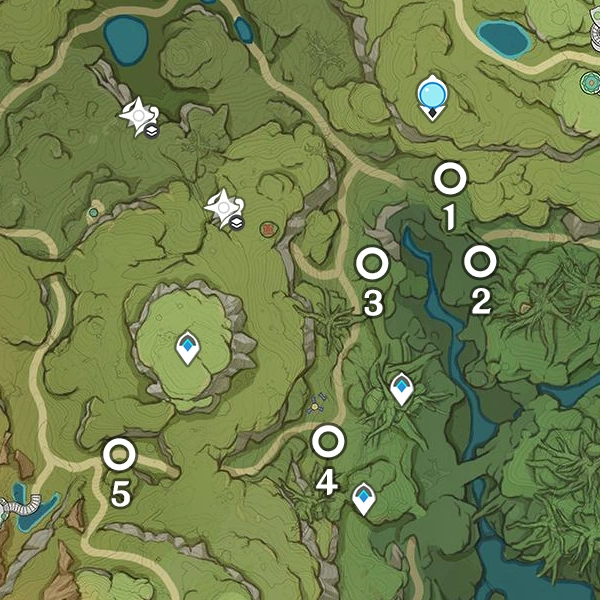
Begins south of the Statue of The Seven in Ashavan Realm.
| Location | Enemies | Notes |
|---|---|---|
| 1 | Wave 1: Wave 2: | |
| 2 | Wave 1: Wave 2: |
There are two  Stretchy Anemo Fungus and a Stretchy Anemo Fungus and a  Floating Dendro Fungus nearby. Floating Dendro Fungus nearby. |
| 3 | Wave 1: Wave 2: | Use Four-Leaf Sigil for easier traveling across terrain. |
| 4 | Wave 1: Wave 2: | There is a Treasure Hoarder camp nearby. |
| 5 | Wave 1: Wave 2: | Transitions to Land of Lower Setekh 1 or Lokapala Jungle 1. |


Land of Lower Setekh

Begins on top of the mountain northwest of Aaru Village.
| Location | Enemies | Notes |
|---|---|---|
| 1 | Wave 1: Wave 2: | Use Four-Leaf Sigil and Wind Current near Teleport Waypoint for easier traveling across terrain. There is an Auspicious Branch nearby. |
| 2 | Wave 1: Wave 2: | There is an Electro Crystal nearby. |
| 3 | Wave 1: Wave 2: | Use Four-Leaf Sigil for easier traveling across terrain. |
| 4 | Wave 1: Wave 2: | |
| 5 | Wave 1: Wave 2: |
|


Land of Upper Setekh

Begins west of the Statue of The Seven in Land of Upper Setekh.
| Location | Enemies | Notes |
|---|---|---|
| 1 | Wave 1: Wave 2: | Use Four-Leaf Sigil for easier traveling across terrain. |
| 2 | Wave 1: Wave 2: |
Use Four-Leaf Sigil, then utilize invisble platform from time challenge. Otherwise, climb the ruin tower nearby. There are two  Geo Slime and a Geo Slime and a  Large Geo Slime nearby. Large Geo Slime nearby. |
| 3 | Wave 1: Wave 2: | |
| 4 | Wave 1:
Wave 2: |
|
Hypostyle Desert
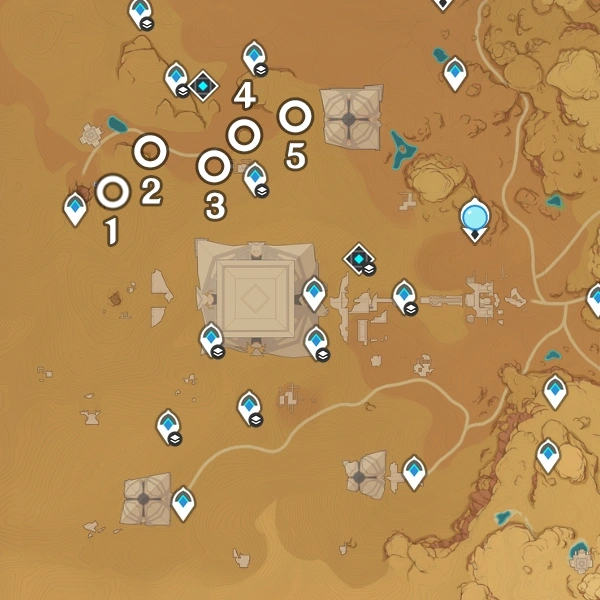
Begins northwest of The Mausoleum of King Deshret.
| Location | Enemies | Notes |
|---|---|---|
| 1 | Wave 1: Wave 2: | Use Four-Leaf Sigil for easier traveling across terrain. |
| 2 | Wave 1: Wave 2: | Use Four-Leaf Sigil for easier traveling across terrain. |
| 3 | Wave 1: Wave 2: | Use Four-Leaf Sigil for easier traveling across terrain. After receiving the outcrop, a Primal Construct: Repulsor will spawn. |
| 4 | Wave 1: Wave 2: | |
| 5 | Wave 1: Wave 2: |
|


Desert of Hadramaveth Southwest

Begins northeast of the eastern-most Teleport Waypoint in Qusayr Al-Inkhida'.
| Location | Enemies | Notes |
|---|---|---|
| 1 | Wave 1: Wave 2: | |
| 2 | Wave 1: Wave 2: | Two Exploding Barrels spawn with wave 1, and one or two more spawn with wave 2. They despawn once the reward is claimed. |
| 3 | Wave 1: Wave 2: | |
| 4 | Wave 1: Wave 2: | Transitions to Desert of Hadramaveth Northeast 1. |


Desert of Hadramaveth Northeast

Begins north of Safhe Shatranj's western Teleport Waypoint.
| Location | Enemies | Notes |
|---|---|---|
| 1 | Wave 1: Wave 2: | |
| 2 | Wave 1: Wave 2: | |
| 3 | Wave 1: Wave 2: | |
| 4 | Wave 1: Wave 2: |
|


Girdle of the Sands

Begins north of the Fatui Tent in Samudra Coast.
| Location | Enemies | Notes |
|---|---|---|
| 1 | ||
| 2 | ||
| 3 | Wave 1: Wave 2: | |
| 4 | Transitions to Lokapala Jungle 1.[Check for possible transition to Land of Lower Setekh] |


Fontaine
Elynas
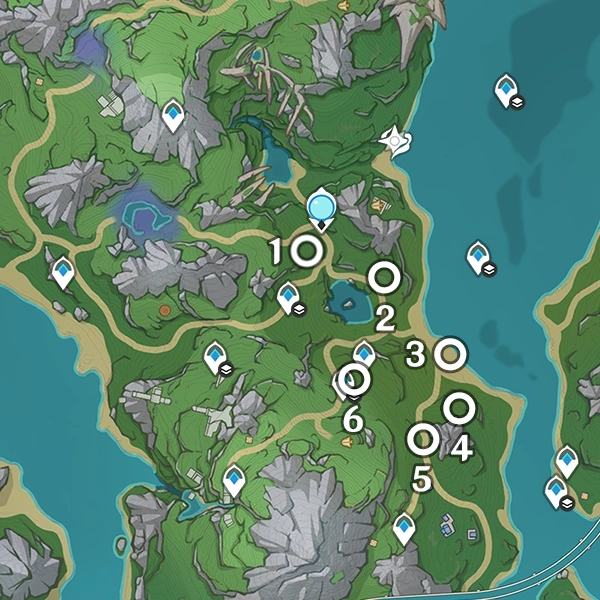
Begins southwest of the Statue of The Seven in Beryl Region.
| Location | Enemies | Notes |
|---|---|---|
| 1 | Wave 1: Wave 2: | |
| 2 | Wave 1: Wave 2: | |
| 3 | Wave 1:
Wave 2: | |
| 4 | Wave 1: Wave 2: | |
| 5 | Wave 1: Wave 2: | |
| 6 | Wave 1: Wave 2: | Transitions to West Slopes of Mont Automnequi 1. |


West Slopes of Mont Automnequi

Begins south of the Teleport Waypoint above the aquarail in West Slopes of Mont Automnequi.
| Location | Enemies | Notes |
|---|---|---|
| 1 | Wave 1: Wave 2: | |
| 2 | Wave 1: Wave 2: | |
| 3 | Wave 1: Wave 2: | |
| 4 | Wave 1:
Wave 2: | |
| 5 | Wave 1: Wave 2: |
|


Mont Esus East
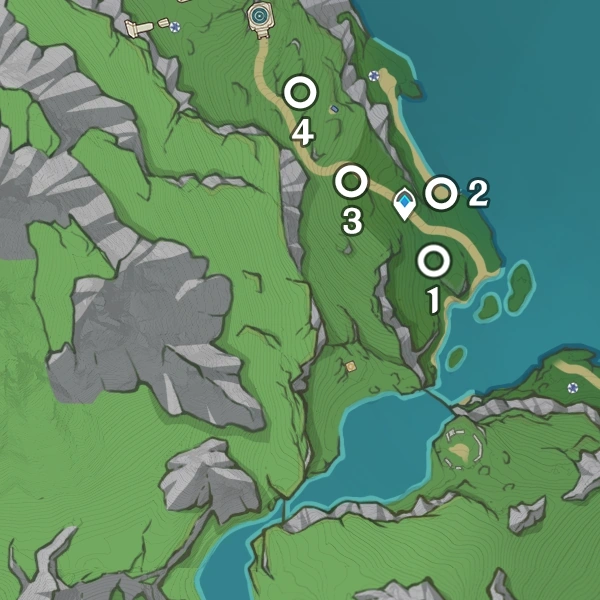
Begins south of the Teleport Waypoint in Mont Esus East.
| Location | Enemies | Notes |
|---|---|---|
| 1 | Wave 1: Wave 2: | |
| 2 | Wave 1: Wave 2: |
Two  Blubberbeast in vicinity, but are not aggressive unless attacked. The nearby Blubberbeast in vicinity, but are not aggressive unless attacked. The nearby  Frost Operative can potentially aggro if accidentally attacked. Frost Operative can potentially aggro if accidentally attacked. |
| 3 | Wave 1: Wave 2: | Two Hydro Ambers spawn near outcrop, will despawn once reward is claimed. |
| 4 | Wave 1: Wave 2: |
|

New Fontaine Research Institute

Begins near the shoreline west of the New Fontaine Research Institute.
| Location | Enemies | Notes |
|---|---|---|
| 1 | Wave 1: Wave 2: |
A  Wind Operative patrols nearby. Wind Operative patrols nearby. |
| 2 | Wave 1: Wave 2: |
An  Annihilation Specialist Mek - Pneuma patrols nearby and may aggro. Annihilation Specialist Mek - Pneuma patrols nearby and may aggro. |
| 3 | Wave 1: Wave 2: | |
| 4 | Wave 1: Wave 2: | Transitions to Erinnyes Forest 1. |
Erinnyes Forest
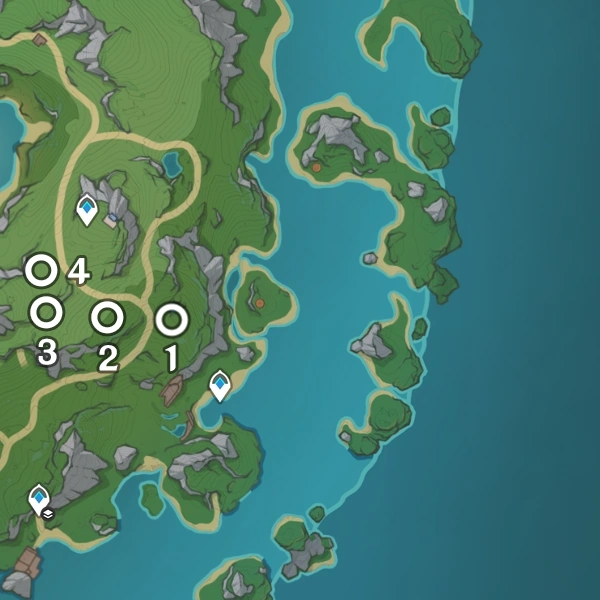
Begins near a pond northwest of the southernmost Teleport Waypoint in Erinnyes Forest.
| Location | Enemies | Notes |
|---|---|---|
| 1 | Wave 1: Wave 2: |
A trio of  Treasure Hoarders: Marksman, Treasure Hoarders: Marksman,  Treasure Hoarders: Scout and Treasure Hoarders: Scout and  Treasure Hoarders: Seaman are nearby and will likely aggro. Treasure Hoarders: Seaman are nearby and will likely aggro. |
| 2 | Wave 1: Wave 2: | |
| 3 | Wave 1:
Wave 2: | |
| 4 | Wave 1: Wave 2: | Transitions to East Slopes of Mont Automnequi 1. |

East Slopes of Mont Automnequi

Begins east of the Teleport Waypoint above the aquarail in West Slopes of Mont Automnequi.
| Location | Enemies | Notes |
|---|---|---|
| 1 | Wave 1: Wave 2: | |
| 2 | Wave 1: Wave 2: | |
| 3 | Wave 1: Wave 2: | |
| 4 | Wave 1: Wave 2: | Transitions to Elynas 1. |
Natlan
Coatepec Mountain
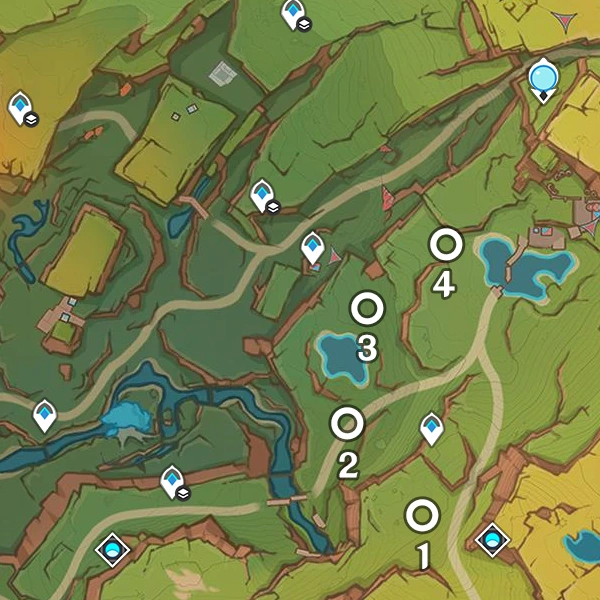
Begins northwest of the domain Blazing Ruins.
| Location | Enemies | Notes |
|---|---|---|
| 1 | Wave 1: Wave 2: | |
| 2 | Wave 1: Wave 2: | |
| 3 | Wave 1: Wave 2: | |
| 4 | Wave 1: Wave 2: | Transitions to Basin of Unnumbered Flames Northeast 1 or Teticpac Peak 1. |


Basin of Unnumbered Flames Northeast
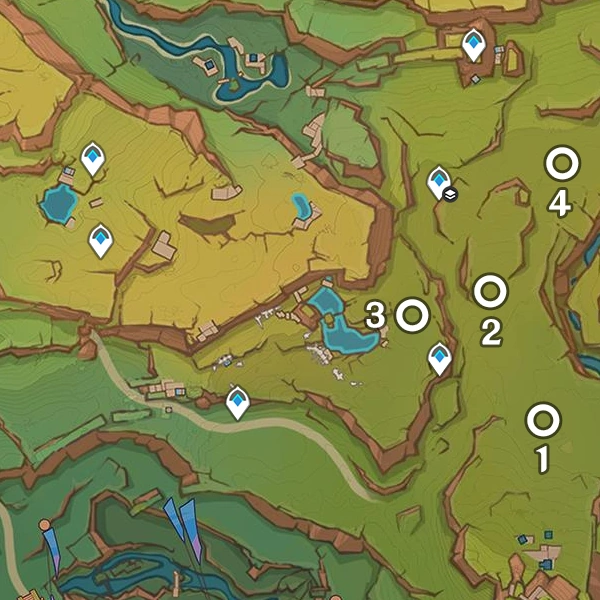
Begins in northeast Basin of Unnumbered Flames.
| Location | Enemies | Notes |
|---|---|---|
| 1 | Wave 1:
Wave 2: | |
| 2 | Wave 1: Wave 2: | |
| 3 | Wave 1: Wave 2: | |
| 4 | Wave 1: Wave 2: | Transitions to Toyac Springs Northwest 1 or Toyac Springs South 1. |


Toyac Springs Northwest

Begins north of the domain Sanctum of Rainbow Spirits.
| Location | Enemies | Notes |
|---|---|---|
| 1 | Wave 1: Wave 2: | |
| 2 | Wave 1: Wave 2: | Transitions to Quahuacan Cliff 1. |


Quahuacan Cliff
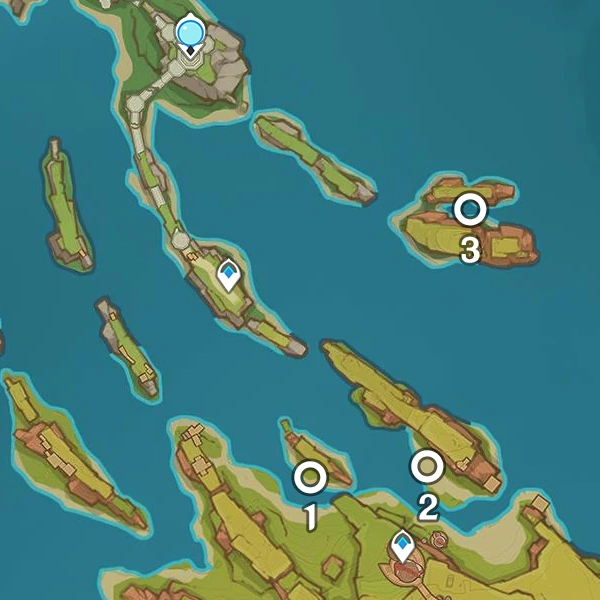
Begins northwest of the northern Teleport Waypoint in "Flower-Feather Clan."
| Location | Enemies | Notes |
|---|---|---|
| 1 | ||
| 2 | Wave 1: Wave 2: | |
| 3 | Wave 1: Wave 2: | Transitions to Tezcatepetonco Range 1 or Easybreeze Holiday Resort Central. |


Tezcatepetonco Range
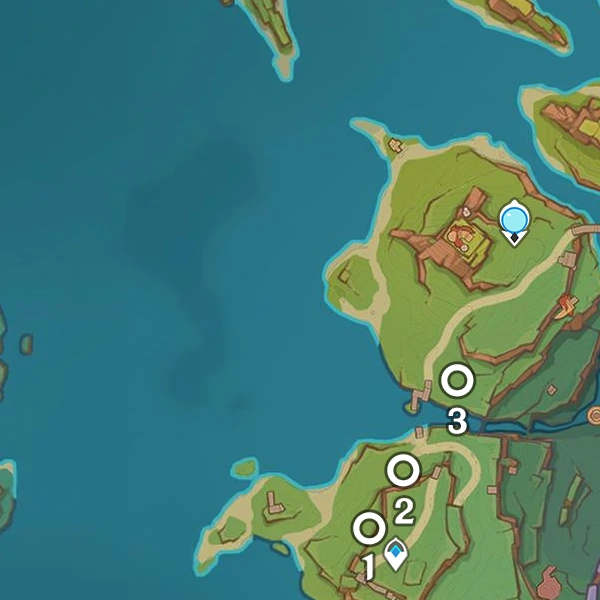
Begins near the shore that leads to Tecoloapan Bay.
| Location | Enemies | Notes |
|---|---|---|
| 1 | Wave 1: Wave 2: | |
| 2 | Wave 1:
Wave 2: | |
| 3 | Transitions to either Coatepec Mountain 1 or Quahuacan Cliff 1. |


Quahuacan Cliff to Ochkanatlan

Begins northwest of the Statue of The Seven in Quahuacan Cliff.
| Location | Enemies | Notes |
|---|---|---|
| 1 | Wave 1: Wave 2: | |
| 2 | Wave 1: Wave 2: | |
| 3 | Wave 1: Wave 2: | |
| 4 | Wave 1:
Wave 2: | Transitions to Quahuacan Cliff 1. |


Toyac Springs South
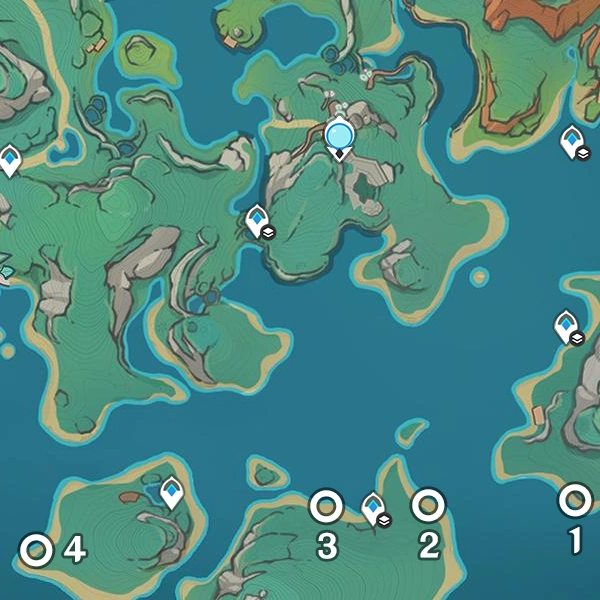
Begins on the southeast island of Toyac Springs.
| Location | Enemies | Notes |
|---|---|---|
| 1 | Wave 1: Wave 2: | |
| 2 | Wave 1: Wave 2: | |
| 3 | Wave 1: Wave 2: | |
| 4 | Wave 1: Wave 2: | Transitions to Quahuacan Cliff to Ochkanatlan 1. |

Atocpan
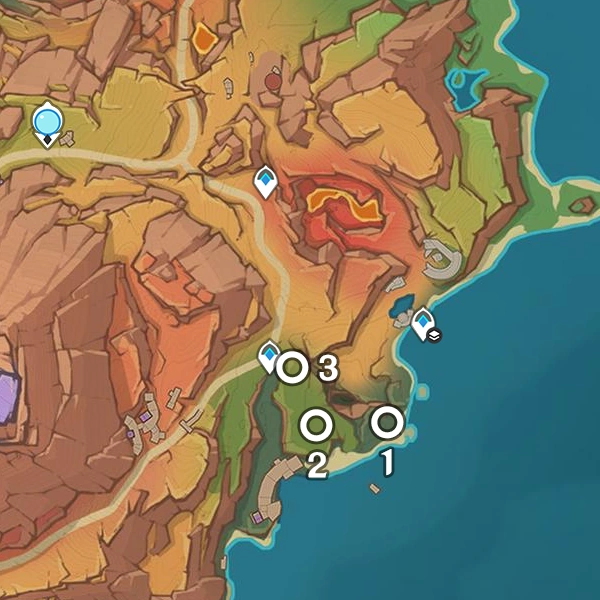
Begins in east Atocpan.
| Location | Enemies | Notes |
|---|---|---|
| 1 | Wave 1: Wave 2: | |
| 2 | ||
| 3 | Wave 1: Wave 2: | Transitions to Basin of Unnumbered Flames South 1 or Easybreeze Holiday Resort Central 1. |


Basin of Unnumbered Flames South

Begins near the southwest Teleport Waypoint in Basin of Unnumbered Flames.
| Location | Enemies | Notes |
|---|---|---|
| 1 | Wave 1: Wave 2: | |
| 2 | Wave 1:
Wave 2: | |
| 3 | Wave 1: Wave 2: | |
| 4 | Wave 1: Wave 2: | Transitions to Toyac Springs Northwest 1 or Quahuacan Cliff 1. |

Teticpac Peak
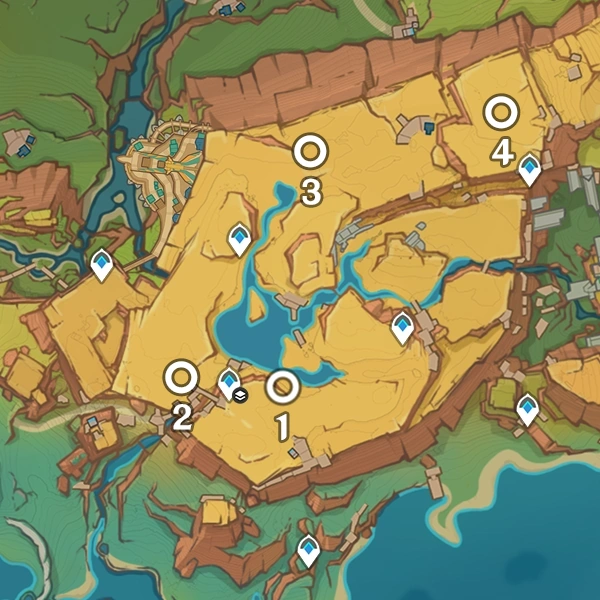
Begins in Teticpac Peak.
| Location | Enemies | Notes |
|---|---|---|
| 1 | Wave 1: Wave 2: | |
| 2 | Wave 1: Wave 2: | |
| 3 | Wave 1: Wave 2:
| |
| 4 | Wave 1: Wave 2: | Transitions to Toyac Springs Northwest 1. |


Easybreeze Holiday Resort Central
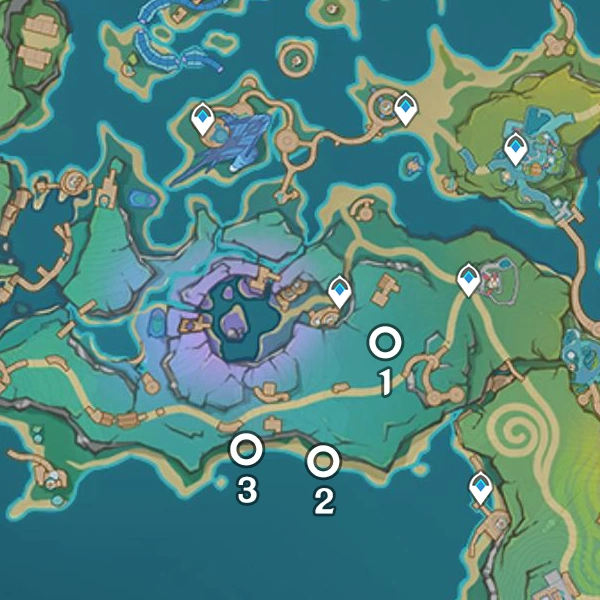
Begins to the south west of Huha Hill.
| Location | Enemies | Notes |
|---|---|---|
| 1 | Wave 1: Wave 2: | |
| 2 | Wave 1: Wave 2: | |
| 3 | Wave 1: Wave 2: | Transitions to Easybreeze Holiday Resort West 1. |


Easybreeze Holiday Resort West

Begins at the most southwestern cliff of the Wavey Bay area.
| Location | Enemies | Notes |
|---|---|---|
| 1 | Wave 1: Wave 2: | |
| 2 | Wave 1: Wave 2: | |
| 3 | Wave 1: Wave 2: | Transitions to either Toyac Springs South 1 or Coatepec Mountain 1. |

Nod-Krai
The last of all Ley Line Outcrops in this region's groups can transition to any group that is not occupied by the Ley Line Outcrop of the other type.
Paha Isle
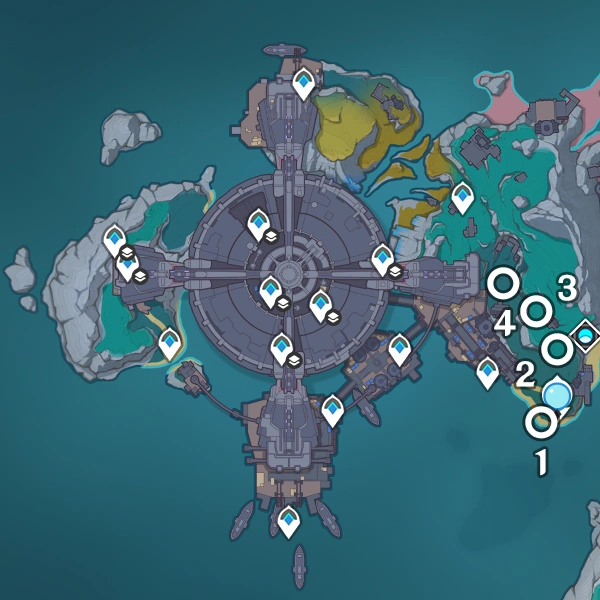
Begins near the Statue of the New Moon in Paha Isle.
| Location | Enemies | Notes |
|---|---|---|
| 1 | Wave 1: Wave 2: | |
| 2 | Wave 1: Wave 2: | |
| 3 | Wave 1: Wave 2: | Transitions to either location 4 or Lempo Isle 1. |
| 4 | Wave 1: Wave 2: |


Hiisi Island
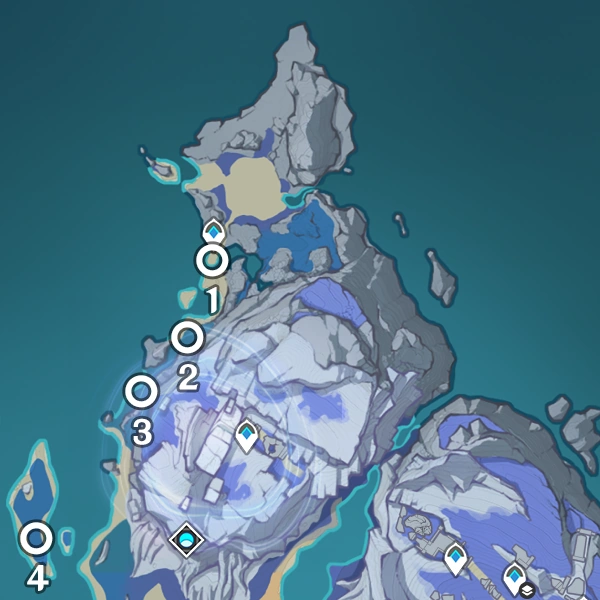
Begins near the southernmost Teleport Waypoint of Hiisi Island.
| Location | Enemies | Notes |
|---|---|---|
| 1 | Wave 1: Wave 2: | |
| 2 | Wave 1: Wave 2: | |
| 3 | Wave 1: Wave 2: | |
| 4 | Wave 1: Wave 2: |


Lempo Isle
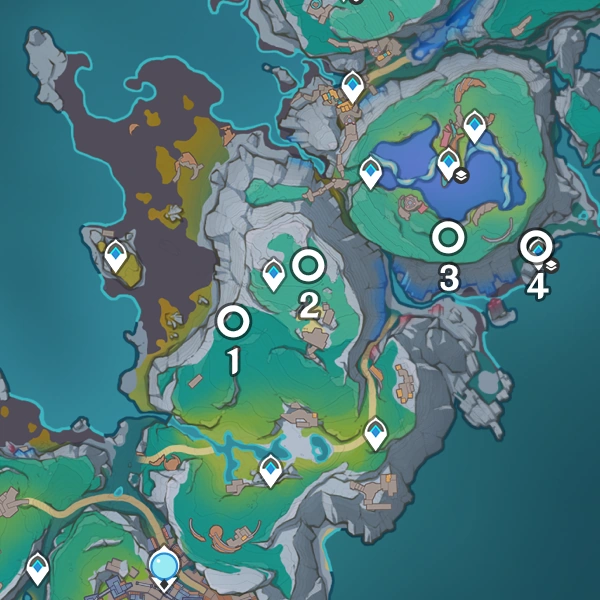
Begins in Lempo Isle.
| Location | Enemies | Notes |
|---|---|---|
| 1 | Wave 1: Wave 2: | |
| 2 | Wave 1: Wave 2: | |
| 3 | Wave 1: Wave 2: | |
| 4 | Wave 1: Wave 2: |


Wavechaser Plain
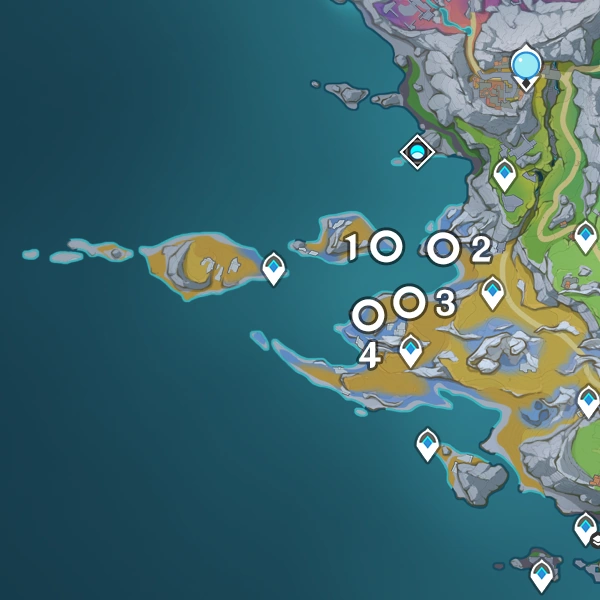
Begins south of Moonchild's Treasures.
| Location | Enemies | Notes |
|---|---|---|
| 1 | Wave 1: Wave 2: | |
| 2 | Wave 1:
Wave 2: | |
| 3 | Wave 1: Wave 2: | |
| 4 | Wave 1: Wave 2: |

Ashveil Peak
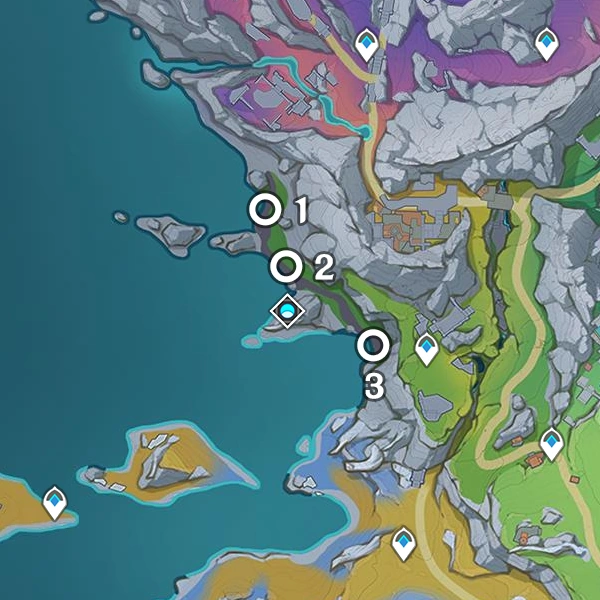
Begins north of Moonchild's Treasures.
| Location | Enemies | Notes |
|---|---|---|
| 1 | Wave 1: Wave 2: | |
| 2 | Wave 1: Wave 2: | |
| 3 | Wave 1: Wave 2: |

Snezhnaya
The last of all Ley Line Outcrops in this region's groups can transition to any group that is not occupied by the Ley Line Outcrop of the other type.
Rankova Zorya

Begins northwest of Rankova Zorya.
| Location | Enemies | Notes |
|---|---|---|
| 1 | Wave 1: Wave 2: | |
| 2 | Wave 1: Wave 2: | |
| 3 | Wave 1: Wave 2: |


Sretomorozsk

Begins east of Sretomorozsk.
| Location | Enemies | Notes |
|---|---|---|
| 1 | Wave 1: Wave 2: | |
| 2 | Wave 1: Wave 2: | |
| 3 | Wave 1: Wave 2: |


Svetloledovka

Begins east of Svetloledovka.
| Location | Enemies | Notes |
|---|---|---|
| 1 | Wave 1: Wave 2: | |
| 2 | Wave 1: Wave 2: | |
| 3 | Wave 1:
Wave 2: |


Gallery


Other Languages
Ley Line Outcrop
| Language | Official Name | Literal Meaning |
|---|---|---|
| English | Ley Line Outcrop | — |
| Chinese (Simplified) | 地脉衍出 Dìmài Yǎnchū | |
| Chinese (Traditional) | 地脈衍出 Dìmài Yǎnchū | |
| Japanese | 地脈の花芽 Chimyaku no Haname | |
| Korean | 지맥에서 피어난 Jimaegeseo Pieonan | |
| Spanish | Brote de línea ley | Ley Line Outbreak |
| French | Ligne énergétique | Ley Line Tooltip for Ley Lineⓘ |
| Russian | Артерии земли Arterii zemli | |
| Thai | Ley Line Outcrop | — |
| Vietnamese | Địa Mạch Sinh Thành | |
| German | Gedeih der Elemente | Flourishment of the Elements |
| Indonesian | Ley Line Outcrop | — |
| Portuguese | Afloramento da Linha Ley | |
| Turkish | Ley Hattı Çıkıntısı | Ley Line Protusion |
| Italian | Fioritura linee geomantiche | Blooming Geomantic Lines |
Blossom of Wealth
| Language | Official Name | Literal Meaning |
|---|---|---|
| English | Blossom of Wealth | — |
| Chinese (Simplified) | 藏金之花 Cángjīn zhī Huā | Flower of Hidden Gold |
| Chinese (Traditional) | 藏金之花 Cángjīn zhī Huā | |
| Japanese | 蔵金の花 Zoukin no Hana | Flower of Hidden Gold |
| Korean | 장금의 꽃 Janggeum-ui Kkot | Flower of Hidden Gold |
| Spanish | Flor de riqueza | Flower of Wealth |
| French | Fleur de la fortune | Flower of Fortune |
| Russian | Цветок богатства Tsvetok bogatstva | Flower of Fortune |
| Thai | ดอกไม้แห่งการชี้แนะ | |
| Vietnamese | Hoa Tàng Kim | |
| German | Blüte des Reichtums | Blossom of Wealth |
| Indonesian | Blossom of Wealth | — |
| Portuguese | Flor da Riqueza | |
| Turkish | Bolluk Çiçeği | Flower of Abundance |
| Italian | Fiore della ricchezza | Flower of Wealth |
Blossom of Revelation
| Language | Official Name | Literal Meaning |
|---|---|---|
| English | Blossom of Revelation | — |
| Chinese (Simplified) | 启示之花 Qǐshì zhī Huā | Flower of Revelation |
| Chinese (Traditional) | 啟示之花 Qǐshì zhī Huā | |
| Japanese | 啓示の花 Keiji no Hana | Flower of Revelation |
| Korean | 계시의 꽃 Gyesi-ui Kkot | Flower of Revelation |
| Spanish | Flor de revelación | Flower of Revelation |
| French | Fleur de la révélation | Flower of Revelation |
| Russian | Цветок озарения Tsvetok ozareniya | Flower of Inspiration |
| Thai | ดอกไม้แห่งความมั่ง | |
| Vietnamese | Hoa Chỉ Thị | |
| German | Blüte der Offenbarung | Blossom of Revelation |
| Indonesian | Blossom of Revelation | — |
| Portuguese | Flor da Revelação | |
| Turkish | İlham Çiçeği | Flower of Inspiration |
| Italian | Fiore della rivelazione | Flower of Revelation |
Change History
- Ley Line Outcrops in regions outside Mondstadt and Liyue now require reaching Adventure Rank 18 and activating at least one Statue of The Seven in the relevant region. This can alter available region options for Ley Line Outcrops in the Adventurer Handbook's "Enemies" tab. Previously, Ley Line Outcrops required specific Adventure Ranks per region.
- Updated rewards screen with ability to consume Fragile Resin or Transient Resin to receive triple rewards.
- Added Ley Line Outcrops to Quahuacan Cliff, Ochkanatlan, and Tezcatepetonco Range in Natlan.
- Added Ley Line Outcrops to Basin of Unnumbered Flames, Coatepec Mountain, and Tequemecan Valley in Natlan.
- Added Ley Line Outcrops to Chenyu Vale: Upper Vale and Chenyu Vale: Southern Mountain in Liyue.
- Added Ley Line Outcrops to Belleau Region, Erinnyes Forest and Morte Region in Fontaine.
- Added Ley Line Outcrops to Fontaine Research Institute of Kinetic Energy Engineering Region and Liffey Region in Fontaine.
- Added Ley Line Outcrops to Beryl Region and Belleau Region in Fontaine.
- Added Ley Line Outcrops to Girdle of the Sands in Sumeru.
- Added Ley Line Outcrops to Desert of Hadramaveth in Sumeru.
- Added Ley Line Outcrops to Great Red Sand in Sumeru.
- Added Ley Line Outcrops to Dharma Forest in Sumeru.
- Added Ley Line Outcrops to Watatsumi Island and Seirai Island in Inazuma.
- Added Ley Line Outcrops to Narukami Island, Kannazuka, and Yashiori Island in Inazuma.
- Dropped items are directly added to the Inventory.
| ||||||||||||||||||||||||||||||||
